Sparks  Fly
Fly
[Home] [PBS
VideoDatabase] [Social Studies] [TSU]
[UVA]
|
Sparks
|
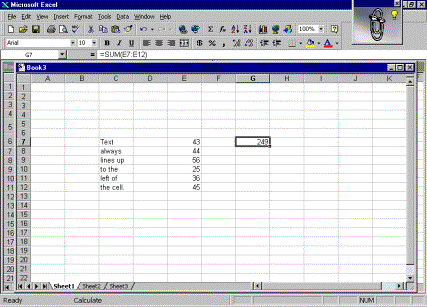
Excel: Entering Data Data comes in many forms—text, numbers, dates, times, formulas. There are three basic categories—labels, values, and formulas. Excel refers to text data as a label. Excel cannot perform calculations on entries that are labels. Excel refers to numerical data as a value. Excel can calculate values—numbers, dates, and times. The third type, formula, is an entry that tells Excel to perform calculations on the values in a cell or group of cells. Excel usually knows which data category you’re using and guesses what you’re going to do with it. Excel displays the data differently—text is lined up to the left of the cell it is in; numbers always line up to the right of the cell.
The result of the calculation is displayed in the active cell. Entering Data
The cell reference tells the address of the
selected cell. Three new
buttons appear on the Formula bar q
The left
button is the Cancel button (red X). q
The middle
button is the Enter button (green check) q
The third
button is the Enter Formula button (=) When you
finish typing in data, press Enter or click the Enter button on the Formula bar.
You can also click in the next cell in which you want to enter data.
Entering Numbers
Text data is
very straightforward. Numeric data
is more complicated. Remember they
are dealt with as values in Excel and you have to know the difference between
valid and invalid numbers. Here are
the rules Valid numbers
include the numeric characters 0-9 and any of these special characters: + - (),
$ % Invalid numbers
would be any other characters not mentioned as valid numbers.
So the letter Z would not be considered a valid number because it’s a
letter Special characters are recognized as numeric data because they are used to write mathematical problems. Equations, formulas, etc. When you enter numeric values, you can include commas, decimal points, dollar signs, percentage signs, and parentheses. Numbers as Text
Sometimes
you will want your numbers treated as text.
If you were using numbers for a ZIP code you would not want to enter them
as numbers but rather as text. To
do this you proceed your entry with a single quotation mark example ‘23322.
The single quotation mark is an alignment prefix that tells Excel to
treat the following characters as text and left-align them in the cell. Numbers as Dates and Times
Dates and
times are values because you can perform calculations on them. To use any date or time values in your spreadsheet,
type them in the format you want them to appear.
When you enter a date in a valid format, Excel converts the date into a
number that represents how many days it falls after January 1, 1900.
Excel will display a normal date on the screen. You can
enter either dashes or slashes with your dates.
You don’t have to worry about capitalization; Excel ignores it when it
comes to dates. Valid Formats for Dates and Times
Editing Data
q
Click the
cell containing the data you want to change. q
Enter the
Edit mode, position the insertion point in the Formula bar entry with a click of
your mouse. q
Make
necessary editing changes. q
When
finished, press Enter or click the enter button on the Formula bar. Shortcuts for Entering Data
To copy existing data into several surrounding cells, use the Fill feature. Ø
Select the
cell whose contents and formatting you want to copy. Ø
Position the
mouse pointer over the cell, press the left mouse button and drag the mouse
pointer over all the cells into which you want to copy the cell entry.
After the cells are highlighted, release the mouse button. Ø
Open the
Edit menu and select Fill. The Fill
submenu appears. Ø
Select the
direction in which you want to copy the entry.
Once you select the direction, the cell data appears in the selected
cells. You can do
this between worksheets. To copy
the formatting of cells from one worksheet to another, select the worksheet
where the cells are located. Highlight
the cells you want to copy. Open
the Edit menu, select Fill, and select Across Worksheets. The Fill Across worksheets dialog box appears.
Select All (to copy the cells’ contents and formatting), Contents or
Formulas, and then OK. Another way to use the Fill Feature
Ø
Ø
Press the
left mouse button and drag the mouse to highlight the cells anywhere around the
selected cell into which you want to copy the entry. Ø
When you
release the mouse button, the contents and formatting of the original cell
appear in the selected cells. AutoFill
AutoFill
copies logic. If you want to enter
the days of the week into your worksheet, you simply enter the first day
(Sunday) and AutoFill inserts the other entries for you.
Ø
Type Monday
into a cell. Ø
Drag the
fill handle up, down, left, or right to select six more cells. Ø
Release the
mouse button and Excel will insert the other entries for you. Excel has a
series of data stored as AutoFill entries.
Data that appears in a logical sequence like the days of the week is
considered series data. Excel has
days of the week and months of the year stored as series data.
You can create your own list of series data to use with the AutoFill
feature. Creating AutoFill
v
Open the
Tools menu and select Options v
When the
Options dialog box appears, click the Custom Lists tab v
Click the
Add button. An insertion point
appears in the List Entries text box where you can type the entries you want to
use for your AutoFill entries. Press
Enter. v
When
finished, click OK. If you have
already typed the entries in a spreadsheet, highlight the text and choose
Options from the Tools menu. Click
the Custom Lists tab and select Import. Excel
copies the selected text from your worksheet and places them in the List Entries
text box. Click OK. AutoComplete
Repetitive
data or the same labels are frequently typed multiple times in worksheets.
Excel offers a new way to speed up the process—AutoComplete.
Excel keeps track of your column entries for each cell.
Instead of retyping, you can right-click the next cell and display a list
of words you have already used in previous cells.
Choose from the list, which is faster than retyping. v
Type the
labels in the first cells column v
When ready
to enter a duplicate label, right-click the empty cell to open a shortcut menu v
Select Pick
from list… v
Choose the
word you want from the list and it is automatically inserted. Cell Tips
If you like
to include notes in your spreadsheet that explain what is happening to the data,
use Cell Tips (also called Cell Notes). The
notes will not affect the data and will not be printed unless to instruct that
they be printed. When your mouse
pointer passes over the cell, the notes pop up. v
Click your
mouse in the cell where you want the note v
Open the
Insert menu and choose Note. The
Cell Note dialog box appears. v
Type in your
note in the Text Note box. v
Click OK Range
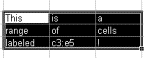
You can
create a linked area of cells in your worksheet.
These are known as a range and are a rectangular group of connected cells
that are connected in a column, a row, or a combination of columns and rows.
They always have to be contiguous and they must form a rectangle.
Why use a
range? You might select a range and
format a group of cells with one single step.
You can use a range to print only a selected group of cells. Ranges are also useful with formulas. Ranges are referred to by anchor points; the top left corner
and the lower right corner. A range
would be written as C3: E5. A range
with more than one cell uses a colon to separate the anchor points.
of cells that forms a rectangle. To select a
range v
Move your
mouse pointer to the upper left corner of a range you want to select v
Press and
hold the left mouse button, and drag the mouse to the lower right corner of the
cell range you are selecting v
Let go of
the mouse button and the range is selected. You can now
name the range incase you want to use it later in other worksheets.
This makes it easier to cut, copy, and move blocks of cells. ¨
Select the
range of cells, and click inside the cell name box ¨
Type the
range name (Valid names can include letters, numbers, periods, underlines;
spaces not allowed) ¨
Press enter
Return to Spreadsheets Handout |
| This page was updated on: 04/10/02 |