Sparks  Fly
Fly
[Home] [PBS
VideoDatabase] [Social Studies] [TSU]
[UVA]
|
Sparks
|
ACCESS
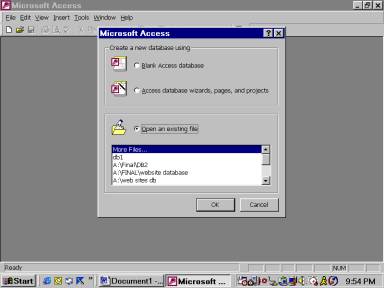
Notes
Open
Access Access
Program Window System
menu icon
System buttons
Title
bar Menu
bar Toolbar Microsoft Access
Dialog
Box Status
bar Meaning
of system buttons Minimize
button/Maximize
button
Close
button Restore
button Title
bar has name of program-double-clicking the system icon closes the program System
buttons allow change in size of the program window, reduce it to the taskbar, or
close it, or change the size Menu
bar has all the commands needed to create and handle databases—the commands
change on the menu bar according to the current context of the program Toolbar
buttons provide access to the most important commands—also context sensitive Status
bar displays short instructions, info about the program, and state of some
special keys Open a databaseOpen
Existing Database More
files OK Select
Drive A: Look
in list for Addresses the click Open Sample
database opens
Title
bar Command
buttons (97
down right side) Tabs
(97—across top) (2000—down side) Database objects
Basic
window of the program. Choose the
database object you want to work with. Move
around the screen by grabbing the title bar and dragging it where you want.
Resize, Always visible until the database is closed.
Tabs—six
tabs Table, Queries, Forms, Reports, Macros, and Modules (2000 adds Pages
because it is HTML ready) Move
to a tab by clicking on it. Each
tab displays a database object Change
the look of objects by clicking View, Large Icons, small icons, list, or details Command
buttons—in 97 on right side of window Three
of them—Open, Design, New—the name of the topmost button changes according
to the active tab—these are for the tables, queries, and forms tab Preview,
Design, New for Reports tab Run,
Design, New for the Macros and Module tab Every
tab shares the Design and New buttons In
empty database only New is available Design
opens the selected tab in Design view Open
is used to open a selected table, query, and form Preview
opens a selected report or print preview Run
is used to run a selected macro or module Mouse
Left—select
something Right—shortcut
menus related to selected object Pointing
& clicking—select—double click launches an action Menu
commands, toolbar commands, accelerator commands (keyboard combos) like Control
+ O same as File, Open Database Close
menu click outside menu with mouse or ESC or ALT Saving
Database
structure and all entries in db are saved together in a single file with the
extension .mdb Database
objects are saved separately (table, query, report, form) all data are saved in
tables and after the first save when you create the db are saved automatically
by Access. When you move from one
record to another data are automatically saved and again when you close the db.
You never have to worry about saving data Save
As/Export saves object and asks whether to save in existing database or to an
external file or database. Save as HTML
Starts
a wizard that converts database objects into Web Pages DB
objects all follow same naming rules. Name
can be 64 characters long; can contain letters, numbers, spaces, and some
special characters. CANNOT contain
periods, exclamation marks or square brackets.
Name cannot begin with a space and preferably not a number
(Access will complain that it is an invalid name if you do any of the
above No Nos) Choose
descriptive names to aid your memory Give
names that clearly reflect the contents of the object Short
names are easier to remember Spaces
should be used carefully and sparingly Suggest
that use Capital Letters instead of spaces BillingAddress
instead of Billing Address Help
Help
from the menu (Contents, Index, Find) Assistant
on toolbar Tips Explore
the help options Wizards
Mini
programs that help you perform a task Cancel—stops
the wizard Back—returns
to previous screen Next—moves
to next screen in wizard Finish—completes
the wizard Use to create a db, table (field builder, lookup, command buttons, expression builder), form, query, and report Closing
DB
File/Close—closes
everything in a db Close
button on right of window closes objects within the db X
at top of db window closes the db When
you close the DB you automatically save it—if you have modified the design
Access will ask if you want to save the changes The
data is automatically changed and you never have to worry about saving
separately Designing
a Database
Pre-planning
is very important. Hard to change
and add to later because you have to backtrack and enter data for everything
that you add or modify Group
data by subject—what is the purpose of your db ·
Group by subject and each
subject will become a table ·
Each piece of info will
be saved in only one table ·
We relate the table on
one element (primary key) a field containing a unique identifier—data in this
field is always different from every row or record in the table (usually a
number) Problem
areas in designing databases
·
Empty fields—don’t ·
Same field in several
tables—don’t o
Hard to update data cause
have to change in several tables o
Essential that place each
piece of data in just one table Designing
fields
·
Once divide into tables
now divide into fields ·
Anything you want to
retrieve should be placed in own field ·
Each field should have
only one piece of data in it ·
Example—first name,
last name—separate fields ·
Avoid storing results of
calculations—do this when you create a report.
Data should be stored that will not be changed by a formula Relationships
·
Created by using a
primary key from one table as a field in another table in the second table
called the foreign key ·
Example—in one table
have a student id number with name, address student id is primary key.
In next table with discipline info we use the student id as foreign key ·
When retrieving
discipline info use student id #--this protects confidentiality of info ·
Relationships established
can use data through foreign keys to query db.
·
Relational db are faster
to query because many small tables easier to search than one huge one with all
info here ·
Example of db planning o
Student info o
Class schedule o
Discipline info
Student info Student ID #(primary key) Lastname Firstname Middleinitial Address City Zip Phone# Parental Information Homerm teacherID#(primary key) Father Mother Status Address1 Address2 StudentID#(foreign key) Discipline info TeacherID# (foreign key) for
referral ReferralID# (primary key) Offense Description Student ID# (foreign key) How relationships
work
One-to-many,
one-to-one, many-to-many Created
by matching primary key in primary table to foreign key in another table One-to-many
is most common ·
One student can have many
referrals ·
Every referral refers to
one student ·
One teacher can have many
referrals ·
Every referral refers to
one teacher One-to-one
are rare—usually stored in same table ·
Can use this to protect
data ·
Band customer—customer
ID—account information Many
to many relationship—complicated and to be avoided if possible ·
Can’t be created
directly ·
Must use a junction table
to relate the two pieces of data ·
Contains foreign keys
from both tables Referential
integrity
Access
tries to ensure that linked data cannot be deleted and data cannot be added
until it is linked Choose
this if you want to protect linked data—the db will not allow deletion or
addition until the relationships are established Example—studentID
must be entered by way of student table before you can enter a referral Creating Database
Create
with and without wizard Wizard
usually creates db does not est. relationships. You have to know how to do this in table wizards Creating Tables
Tables
tab, New, New Table then create it with wizard or in design or datasheet view,
OK Datasheet view
Create
the table simply by typing data into it Can’t
create memo field $
Assumes currency Date
assumes date field Doesn’t
name fields—calls it field 1, 2 have to go to design view to change names of
fields Will
est. primary key if you don’t—warns at save and sets autonumber field called
ID Design View
Enter
names and descriptions of the fields in the appropriate columns, select the data
type and set the properties of the fields Table Wizard
Quick
and easy ·
If there are tables
already in the db, wizard will ask you how you want to relate the new table ·
Collects the info needed
then creates the table ·
Tables tab, New select
Tables Wizard ·
Select Personal,
Addresses ·
AddressID > from
Sample Fields ·
Click on Rename Field OK ·
> Add field ·
>> Adds all fields
from Sample Fields List ·
< Delete a field ·
<<Delete all sample
fields ·
Add the following
lastname, firstname, birthdate, sendcard, notes, dateupdated ·
Next title the table
Friends ·
Yes, set primary key for
me, Next ·
Modify the table design ·
Finish ·
Table Design View, Close
the table ·
Add a second table with
wizard o
Tables tab, New, New
Table, ok o
Personal, Addresses o
Add AddressId and rename
to FriendID o
Add AddressID and rename
to LocationID o
Street address, (select
address field twice) add city, stateorprovince, postalcode, country, dateupdated o
Next o
No, I’ll set primary
key, Next o
Check that the name
FriendID appears in the box at the top. Select
Numbers I enter when I add new records, Next o
Next box determines the
relationship between the tables. Check
and make sure Access has it correct. Select
the row and click relationships. Select
the type of relationship. One
record in the Friends table will match many records in the Addresses table, Next o
Modify the table design,
Next o
Look at design view and
examine the table o
Check the properties of
the fields o
Check that the friendID
is Number data and that the General tab show field size of long integer o
You add a phone number
table using the table wizard Table Design View
·
Used to design the fields
of a table ·
Each field given a name
and data type ·
Properties of field
appear in bottom left of design view window ·
Move to row then go to
bottom and modify properties ·
Right hand corner
reserved for context sensitive help. Always shows help text related to active item Data types
·
Default type is
text—see table ·
Remember o
Fields of memo, OLE
object, Hyperlink cannot be indexed therefore can’t sort or group on them o
AutoNumber gives unique
number to each record. Once given
can’t be changed or removed ·
Field Properties o
Two tabs General and
Lookup o
Usually all the
properties are in general o
Lookup reserved for
lookup fields o
Properties vary according
to data type §
Field size §
Format §
Caption §
Default value §
Validation rule §
Validation text §
Required §
Indexed §
Number and currency have
a decimal places property §
Text, memo and hyperlink
have Allow Zero length property §
OLE Object has Caption
and required §
New Values only found in
AutoNumber fields Field builder
·
Used to add fields ·
Select from the same
sample tables and fields used in table wizard ·
Start by clicking on
magic wand on the toolbar or right click on row where you want to add the field
and choose build Indexes
·
Index a field if it will
be used often to retrieve data from a table ·
Makes sorting and
searching faster ·
Never index every field
slows the updates ·
Index by changing the
index property to yes duplicates ok or yes no duplicates or click index button
(lightening bolt lines on toolbar) Import Table
Copy
the design of a table from another database or from a different kind of file.
You can create an Access table from an Excel spreadsheet Link table
Allows
you to link your table to another database or to an external file.
Link a new access table to an excel spreadsheet Tables,
New, New Table, ok Design
View Type
LocationID in field name column Tab
moves between columns Data
type default text and 50 characters select AutoNumber as the new data type Field
name next row and type Location then Enter Accept
default you could enter a
description—if you do, it will appear on the status bar when the field is
active Make
LocationID primary key by moving to row and clicking primary key button (key) or
Edit/Primary Key File/Save
enter name of table Locations and save then close Changing design of a
table
Change
the design of the addresses and phone numbers table to add a lookup field.
This is a field that takes its values from another table.
The locationID will have a list box with data retrieved from the
locations table. The list box will display possible locations in ordinary
language but the table will list location by ID Table,
select Addresses, Design view Go
to Location ID, go to data type and select Lookup Wizard Follow
wizard—select I want the lookup column to look up the values in a table or
query Locations
table, Next Select
fields you want in list box Location
> LocationID
> Next Hide
key column recommended is checked Finish
yes Enter
data into table in Datasheet view Record selectors
Ø
Active or current record Ø
Pencil record currently
being created or edited Ø
* New record Ø
Circle with
slash—locked record can’t be edited Enter
data into the friends table (10 friends) Hint—use
leading zeros when entering dates Editing records
Move
between records tab or enter to move back Shift + tab Delete
by pressing key when record active Edit,
Undo Discuss
changing column width and height and selecting rows and columns Moving
columns—select and drag and drop in new position Hiding/showing
columns—select column choose Format/Hide Columns Format/Unhide
columns gives list in dialog box visible have check in front to bring back put
check in front and close Freezing
and unfreezing columns—make column always visible Format/Freeze to release
Format/Unfreeze all columns Renaming
columns—Format/Rename column Select
fonts and cell effects—Format/font in Datasheet view this changes whole thing
not a single record Format/Cells
opens cell effects change orientation of text, color, and gridlines, background Relationships
between Tables
Create
or edit relationships in relationships window Toolbar
looks like chart/map Or
Tools, Relationships Show
tables dialog box must have at least two tables here To
create relationship drag a field often primary key from one table to the
equivalent field (foreign key) in the other Get
relationship dialog box Join
type—change properties that affect queries Relationship
between tables shown with line between tables on related item Enforcing
referential integrity—Access will try to ensure that relationships between
records always remains valid. Linkages
will always be checked before allowed to continue with entries of records Cascade
update related fields—if primary key field in primary key table is changed
will make change in all tables Cascade
delete related records—if record deleted from primary table, deleted
everywhere Saving
relationships—automatically Viewing
relationships—Tools/Relationships—shows the connections Forms
Choices Design
view Form
wizard Autoform
columnar Autoform
tabular Autoform
datasheet Chart
wizard (form with chart) Pivot
table wizard (used with Excel) Form
Wizard—Friends form Select
Friends table ok Select
fields for the form—use all fields except FriendID Columnar Select
a style for the form—Pattern, Next Type
title Friends Form Check
Open the form to view or enter information, Finish Get
the form note navigation buttons at bottom View
form Form
view, Design view, and Datasheet view View
menu or view on toolbar Form Design View
Change
font size—see copies pages 93-101 Sorting
data—default is sort by primary key Select
field—then A-Z or Z-A Enter
5 more friends with the form just created Query
Query
tab, New, New Query Design
view (select tables, select fields) Simple
query wizard Cross
tab query wizard (SUMMARY of selected fields) Find
duplicates query wizard (finds duplicate records) Fine
unmatched query wizard (finds records in two tables that have no matches to
anything) Simple
Query Wizard Select
the table Select
the fields Design
View Tables,
Fields Sort Criteria—what
you want to check for
|
| This page was updated on: 04/10/02 |