Sparks  Fly
Fly
[Home] [PBS
VideoDatabase] [Social Studies] [TSU]
[UVA]
|
Sparks
|
|
PowerPoint What Is It? How can I use
it? PowerPoint is multimedia presentation software. Part of the Microsoft Office 97 set of programs. The possibilities are endless: ♫
Imbedded
presentations in Web pages ♫
Create
Web pages ♫
Internet
ready. Hyperlinks ♫
Custom
shows for specific audiences ♫
Custom
animation ♫
Presentation
conferencing ♫
Automatic
spell check ♫
Pack
and Go option ♫
Stereo
narration to slides ♫
Ability
to create custom templates and layouts ♫
Ability
to present to more than one monitor How can
PowerPoint be used?
♫
On-screen
presentations ♫
You can
present on one monitor, multiple monitors, or using other hardware through
television monitors or projection devices.
♫ Handouts ♫
Print
handouts in multiple forms
♫ Speaker
Notes ♫
Page with
slide as in presentation on top and location at bottom of page for you to print
your ideas or the script of what you want to say
♫ 35mm Slides
or Overheads ♫
You can
create transparencies in either color or black and white ♫
You can
create 35mm slides which can be processed by photo companies or over the
internet to be used in slide projectors The Display Screen The screen
will look familiar. The toolbars,
button bars, and menu bars are like those in other Office applications. Like other office programs when the mouse slides over a button and is held
for a moment, the function of the button is displayed.
The following screen captures show at a glance the commands available on
the PowerPoint toolbars and menus. The Upper Menu
Draw Tools The Draw
Tools toolbar can be placed anywhere on the screen. The toolbar will fit itself
where ever you place it, bottom, top, or side.
Drop-down
Menus
Insert Menu Format Menu 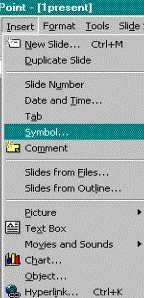
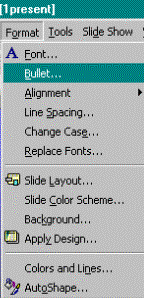
Slideshow Menu Window Menu Help Menu
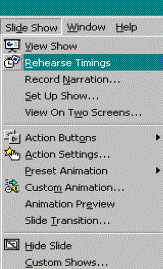
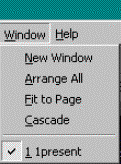
Customizing
Menu To customize
your menu click on the Tools menu and select Customize. This opens the dialog box where you can decide what you want
on your menus and toolbars.
Viewing
Options
Slide View Displays the
actual slide in working form allowing you to edit all text boxes and images.
Outline
View Presentation
in list format which allows you to edit text very easily. Slide Sorter
Notes Page This view
allows you to view the speaking notes for each slide.
These notes act as a prompt for speakers. The audience does not see the information on these notes,
only the presenter.
Allows the
user to begin the slide show. It
will run through all the slides you have created as you click your mouse.
This allows you to see the finished product the audience will see. Editing Slides Adding and
Deleting Slides ♫
Add a slide
by selecting the New Slide Button or select the New Slide Command from the
Insert menu. ♫
Note the
slide will be inserted wherever the insertion point is positioned. To delete a
slide ♫
View slide
that is to be deleted ♫
From the
Edit menu select Delete Slide Jazz Up the Slides The change
the Color Scheme you must be in Slide View. ♫
Under the
Format menu select Slide Color Scheme ♫
Click on the
color scheme that suits you ♫
Click Apply
to change the slide or Apply to All to change the entire show Change the
Layout The change
the layout again you need to be in slide view (can do in other views but this is
easier). ♫
View slide
to be changed ♫
Format menu,
choose Apply Design command ♫
Choose
Presentations ♫
Select the
design you like ♫
Apply to
apply the style to your show Creating
Templates and Layouts This takes
time and creativity. The program
gives you pre-made (those Microsoft programmers spent lots of time on this)
templates but you can adapt them or create your own. ♫
Choose the
blank presentation page when you begin PowerPoint ♫
Select the
blank slide in the AutoLayout ♫
On the blank
page that appears, insert your own background, text, images and other graphics ♫
Save the
changes to the slide and use them as a template in later presentations.
Choose Save As then select Presentation Template from the Save as Type
pull-down menu. Adding Pictures Clip Art is
included with the program simply from the Insert menu click on Clip Art.
This opens a window full of clip art images. From File From the
Insert Menu select From File. This
allows you to select a file from a folder.
Search options are in the bottom of the dialog box or you can search
manually from the Look in box. (This
is how you use clip art from other programs.) From Scanner Select from
Scanner. Follow the scanner
instructions and click Insert when completed From Digital
Camera PowerPoint
will pick up most picture formats
including jpeg and gif which are the usual formats for camera pictures.
If you have difficulty use the Insert Picture from File to get a digital
camera picture. Using these
methods you can also insert charts, WordArt, Word tables, and AutoShapes to your slides.
WordArt
provides shape and color options for words, giving your words more impact in
your presentations. Hyperlinks PowerPoint
97 has the ability to add links to the Internet.
These hyperlinks allow the presenter to jump to favorite Web addresses,
other parts of this presentation, another presentation, or another Office
document. To insert a hyperlink ♫
Select the
text or image you wish to format as a hyperlink ♫
♫
When this is
selected the Hyperlink dialog box appears, allowing you to insert a Web address
or internal path to the link. ♫
Select OK
when finished. You can also
create a hyperlink using the Insert Menu.
♫
Choose the
slide that requires animation ♫
Select the
image or text to be animated and press ♫
the
Animation Effects button on the Formatting toolbar This
will open the Animation Effects dialog box.
Animation refers to the way the separate items move onto a slice. Choices
include: Ø
Drive-in
(effect approaches from the right side of the screen) Ø
Flying
(effect causes the object to approach from the left side of screen) Ø
Laser
(effect causes letters to approach one by one with the addition of a laser
sound) Ø
Typewriter
(causes the text to approach as if typed with sound) Ø
Camera
(causes the title to appear with the sound of a camera clicking) Ø
Flash once
(causes the title to flash) Ø
Drop-in
(causes the image to drop from the top of the screen) Ø
Custom
animation (allows you to make specific changes to the animation selected for
each image) You can also
animate from the Slide Show menu. Choose
Preset Animations, Custom Animations or Animation Preview. Sound Ø
Select the
slide for which sound is needed Ø
Choose
Insert menu and click on Movies and Sound Ø
Select where
you will retrieve the sound from (compact disc, sound file, sound gallery or
record your own) Ø
After you
select the file, an icon will appear on the slide.
Click and drag it to the desired location. Ø
When you
click on the icon, you will hear the sound. Printing the
Presentation ·
A printout
of miniature slides can be used to get an overall view of the presentation ·
PowerPoint
will print in any view by executing the Print command from the File menu ·
Handouts can
be printed six to a page, three to a page or 2 to a page. Making the Presentation A successful
presentation is carefully planned before it is created.
Narration You can add
a narration to the slide presentation. q
Select the
slide to which you wish to add narration q
Choose
Record Narration from the Slide Show menu q
Select the
quality of recording from Settings q
Start
recording. This will take you to
the Slide Show view and allow you to record voice narration as you proceed
through the actual presentation. Custom
Soundtrack ¨
Select the
Custom Soundtrack under the Slide Show menu ¨
The Custom
Soundtrack dialog box appears. Choose
the appropriate options ¨
Choosing the
Sound Track option will add sound to the entire presentation, not just the slide
you are currently viewing. Presenting to More than One Monitor PowerPoint
allows you to present to more than one monitor.
You must specify which computer will be the presentation computer or
presenter. To hook up multiple
monitors, choose View on Two Screens from the Slide Show menu. Pack and Go ¨
Under the
File menu select Pack and Go command ¨
The Pack and
Go Wizard will activate ¨
Click on the
appropriate options ¨
Selecting
the viewer for Windows95 or NT allows the presentation to be compressed and
stored on a 1.44MB disc. This also
allows the presentation to be viewed on other computers that have not been
preloaded with PowerPoint. ¨
When all
options have been selected, press Finish and your presentation will be Packed
for movement to another computer Troubleshooting—Common Problems in PowerPoint Problem—As
I add text I can’t stop the program from adding bullets each time I press the
RETURN key. ¨
To remove
the bullets, click on the Bullet button Problem—The
animations are not working ¨
Animations
only work in Slide Show view. Problem—When
a chart is added, it covers the entire slide. ¨
You must
size the chart. Select it and grab
a handle to resize it to the size that you desire. Problem—Some
of my menu options are gray and nothing happens when I click them. ¨
They are not
active because they can’t be used at the current time. If you are not working on a picture, then the drawing tools
are dormant (grayed out). Problem—Which
mouse button should I use? ¨
The left
mouse button is the traditional button used to command the program.
Windows95 uses the right mouse button and will deliver pop-up menus that
pertain to whatever you are currently pointing the mouse arrow. Problem—I
can’t see the toolbar buttons. ¨
Open the
View menu and click Toolbars. Choose
Large Buttons at the bottom of the Toolbars dialog box and click OK. Problem—I
did not intend to delete a slide. How
can I restore it? ¨
Immediately
after you delete a slide, you can click on the Undo button on the Standard
toolbar or choose Edit, Undo OR Control + Z Problem—I
cut something that I didn’t want to cut! ¨
If you
haven’t moved your insertion point, simply click the Paste button or press
Control + V. If you have moved in
the document try the Undo button or Control + Z. Problem—I
don’t want to put text where a placeholder exists in the layout slide but I
like that slide layout. What do I
do? ¨
If you leave
a placeholder empty it will not show in your Slide Show Problem—When
I click insert Microsoft Word Table button nothing happens. ¨
Even though
the button appears on the toolbar, it will not work unless you have Microsoft
Word installed on your computer. Problem—I
inserted a slide in the wrong location. How
do I move it? ¨
Choose View,
Slide Sorter to change the Slide Sorter view.
Drag the slide to the location you want. Problem—I
am in Outline view and everything just disappeared. ¨
Don’t
panic. You should see a
shaded underline under each of the slide titles.
You have clicked on the Show Titles button.
To display the hidden details, click the Show All button. Problem—PowerPoint
is determined to tell me that my name is misspelled. How do I correct this? ¨
By adding
your name or any frequently used or unusual word to the dictionary and you will
no longer be treated as a misspelling Problem—How
do I get out school logo into my computer? ¨
Use a
scanner to create an electronic file. Once
your image is on disk, you can insert it and manipulate it just like any other
piece of clip art. Problem—I
don’t have a color printer. Will
my colors show up well in black and white? ¨
To ensure
that your colors don’t translate poorly, make sure you’ve checked the Black
and White check box on the Print dialog box from the File menu. Printing in Black and White eliminates the guesswork and you
know that your handouts will be readable. Problem—No
sounds come out of my computer and I have them in my slide presentation. ¨
Sound
effects only are available on computers that have installed soundcards.
IF the computer makes other sounds, then there may be a hardware problem. Problem—How
do I determine what type of installation to choose? ¨
For most
people a Typical installation is fine. The
Custom Installation lets you pick and choose to install the features you want.
If you don’t have much space on you hard drive choose the Compact
installation which uses the least space. Help
will not be available and you will need to keep the CD in the drive to use Clip
Art, Sounds and other features. Problem—Why
do I have to use Uninstall to remove components?
Why can’t I go to DOS and delete? ¨
Software is
so complicated now that removal of one innocent looking file can crash your
whole hard drive. Many programs use
the same files so it is very important to allow the software manufacturer
uninstall components and not damage other programs on you computer.
SetUp removes components that you no longer need while leaving the parts
of the program that you still want to use. Return to Presentations Handout
|
| This page was updated on: 04/10/02 |