Sparks  Fly
Fly
[Home] [PBS
VideoDatabase] [Social Studies] [TSU]
[UVA]
|
Types of graphic files (.bmp,.gif, .jpg) | |
| Inserting and Editing Graphics |
- Graphics from other sources
- Clipart from CD ROM
- Graphics from the Web
Inserting and Editing Graphics (Microsoft Word)
- Open Microsoft Word
- Click Insert
- Select Picture and Clipart
- Select a category and a picture to insert into your document.
- Click Insert
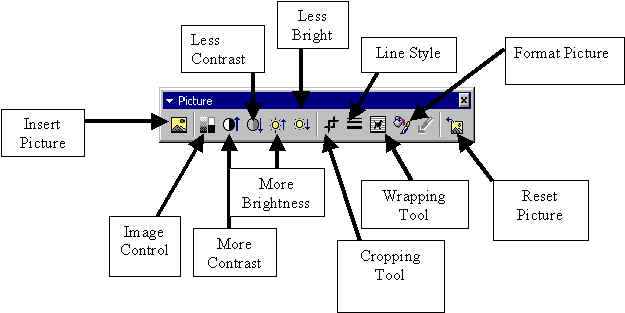
- If the Picture Toolbar (pictured below) is not displayed, click View, Toolbars and select the Picture Toolbar.
Cut, Copy and Paste
- Click Edit, Copy or Cut.
- Next, click Edit and Paste.
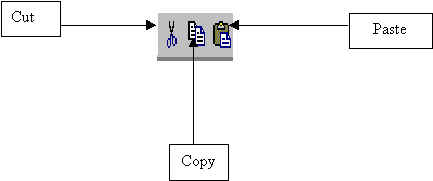
- Or, you can use the shortcut button from the standard toolbar. These buttons are shown below.
Shortcut Keys can also be utilized
Ctrl + C = Copy Ctrl + X = Cut Ctrl + V = Paste
Creating autoshapes, text boxes, word art, etc..
- Use the Drawing toolbar below to add various graphics to your document.
- If the toolbar is not visible, click View, Toolbars, and select Drawing.
![]()
*This toolbar is usually visible on the bottom of the Microsoft Word screen.
Ordering Objects
- Click on the object or graphic that you want to move forward or backward. Click Draw on the drawing toolbar (pictured above), and select order.
Grouping Objects
- Click on the "arrow tool" pictured above on the drawing toolbar.
- Click and drag to select all of the objects you want to group. You should notice handles around each individual object.
- Click Draw and select group. Your individual objects will now be one big "grouped" object.
Adding Clipart from a CD ROM
- Select Insert, Picture, From File.
- Change to the CD ROM drive.
- Double-click to open a clipart folder with the theme you are looking for.
- Click Insert, when you find the graphic you want.
Saving Clipart from the Web
- Visit a free clipart website (be sure to check copyright information)
- Right-click with your mouse on the graphic you want to save to use in your document
- Next, use the left-click mouse button to select "Save image as..."
- Change to the Floppy a: drive or a folder on your hard drive.
- Click save.
- To insert your picture in a document, click Insert, Picture, From File and change to your a: drive or folder where the graphic was saved.
Source: Cotton, Jarred. https://members.tripod.com/jacotton